> For the complete documentation index, see [llms.txt](https://extender.router.works/llms.txt). Markdown versions of documentation pages are available by appending `.md` to page URLs; this page is available as [Markdown](https://extender.router.works/ezr13/configuration/login-extender.md).
# Login Extender
## Connect to Extender
### Wi-Fi Connection
After being connected to the electrical outlet, the EZR13 extender will automatically turn on the power. After successfully booting up, you can join the Wi-Fi hotspot **`Extender-WiFi-xxxxxx`**. The last six characters are the Wi-Fi module's Mac address.
The default Wi-Fi hotspot has **no encryption**. Connect to this Wi-Fi hotspot on a computer, laptop, or smartphone.
### LAN Connection
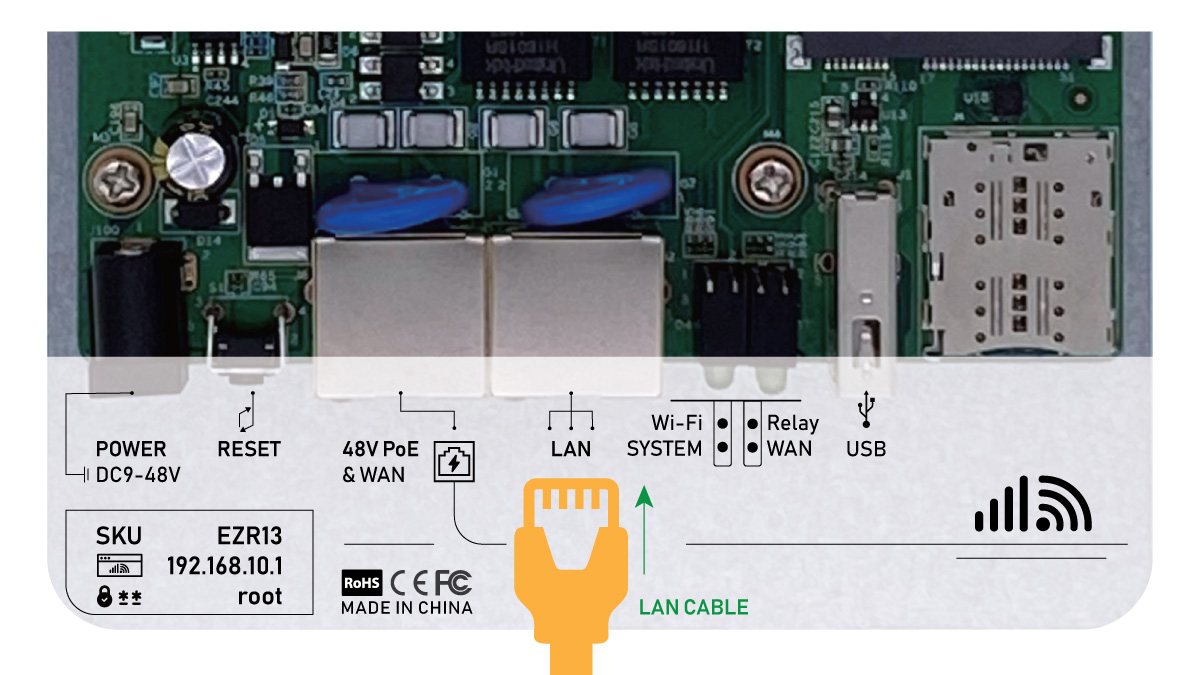
You can also connect a computer to the LAN port of the motherboard to access the Ethernet provided by the extender.
LAN connection to WiFi WiFi Extender
### IP Settings
#### DHCP
The DHCP server is enabled on the WiFi extender. DHCP dynamically assigns the IP address, gateway, domain name server, and other information to the connected devices. Below are the default DHCP settings.
Router Address (Gateway): 192.168.10.1\
Subnet Mask: 255.255.255.0 (24)\
DHCP IP Pool: 192.168.10.100\~254\
DHCP Lease Time: 12 Hours
If the DHCP function is activated on your device, it will automatically obtain the intranet IP and router IP addresses. Otherwise, you need to configure the IP addresses manually.
#### Static IP
Configure TCP/IP on your connected devices, and ensure the IP address is within 192.168.10.100\~249. The subnet mask should be 255.255.255.0. The router address should be 192.168.10.1.
On iPhone: Goes to `Settings` > `Wi-Fi` > `Advanced` \
On Android phone: Goes to `Settings` > `WLAN` > `Advanced` \
On Mac: Goes to `System preferences` > `Network` > `Wi-Fi` > `Advanced` > `TCP/IP`
**On Windows:**
Goes to `Start` > `Control panel` > `Network and internet` > `Change adapter setting` (on the left window panel) > `Local area connection` > `Properties` (right click) > `TCP/IPv4` (Internet Protocol version 4) > `Properties` > `General`.
Choose `Obtain an IP address automatically` and `Obtain DNS server address automatically` Click `OK` to exit settings.
Click `OK` again in the `Local area connection properties` to apply the new configurations.
## Login Extender
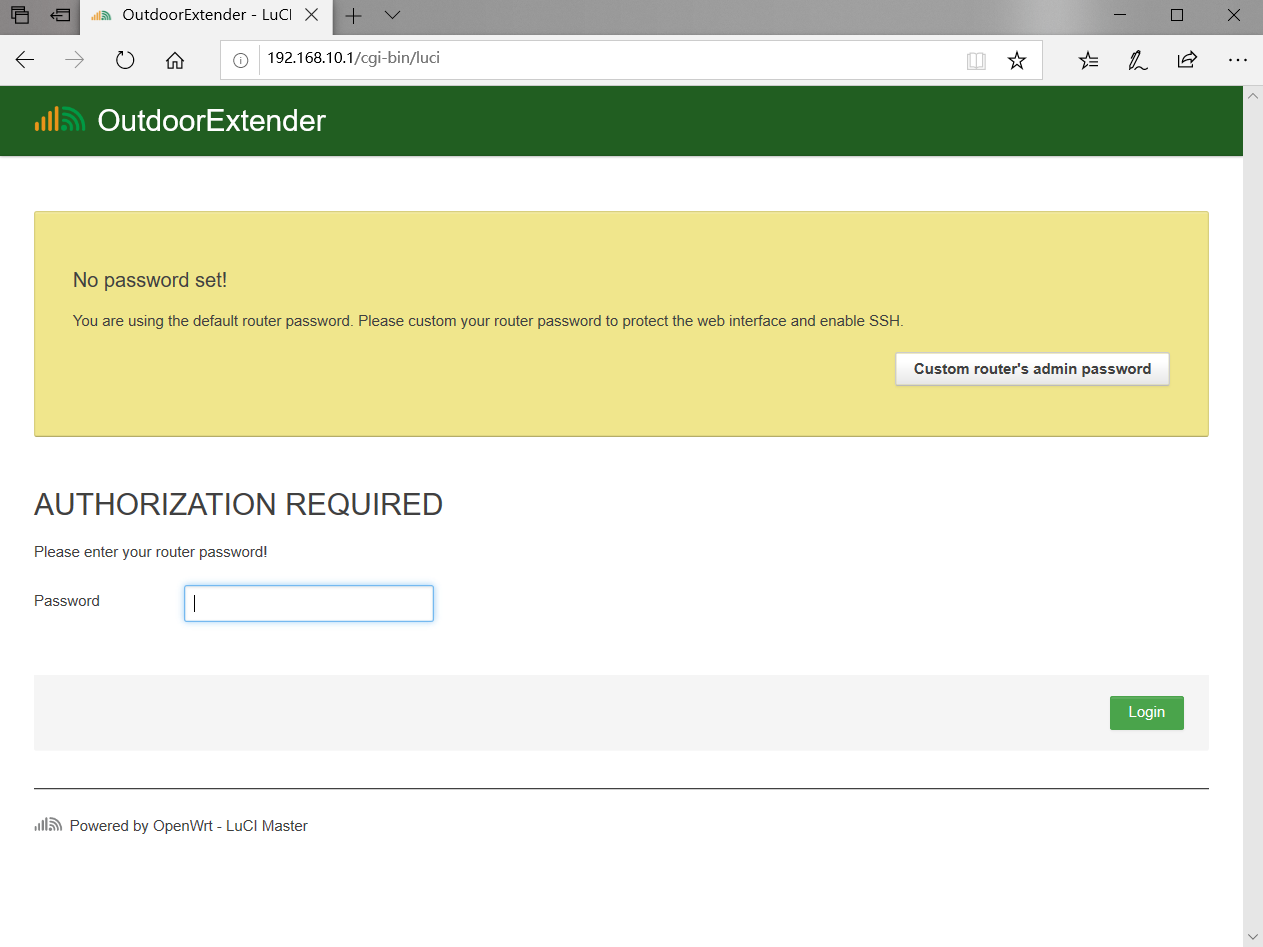
After connecting your smartphone or computer to the router, open a web browser and type **`http://192.168.10.1`** in the URL address bar. Use default password 🔑`root` or `admin` to log in to the WiFi extender's admin.
Login Extender's Admin at http://192.168.10.1
{% hint style="info" %}
If unable to access the extender's admin with `192.168.10.1`, please clear the cache on the web browser or use the below complete URL path. 🔗`http://192.168.10.1/cgi-bin/luci`
{% endhint %}
{% hint style="warning" %}
The default URL prefix is **`http://`** instead of `https://`.
{% endhint %}
---
# Agent Instructions
This documentation is published with GitBook. GitBook is the documentation platform designed so that both humans and AI agents can read, navigate, and reason over technical content effectively. Learn more at gitbook.com.
## Querying This Documentation
If you need additional information that is not directly available in this page, you can query the documentation dynamically by asking a question.
Perform an HTTP GET request on the current page URL with the `ask` query parameter, and the optional `goal` query parameter:
```
GET https://extender.router.works/ezr13/configuration/login-extender.md?ask=&goal=
```
`ask` is the immediate question: it should be specific, self-contained, and written in natural language.
`goal` is optional and describes the broader end goal you are ultimately trying to accomplish on behalf of the user. GitBook uses it to tailor the answer towards what is most useful for that goal.
The response will contain a direct answer to the question and relevant excerpts and sources from the documentation.
Use this mechanism when the answer is not explicitly present in the current page, you need clarification or additional context, or you want to retrieve related documentation sections.